Adobe CC 2015 How-to: Installing Creative Cloud Updates
Adobe CC 2015 is here, and they’ve changed their installer. Here’s what you need to know about how to install applications and to keep older versions on your system. (They may be automatically deleted!)
Beginning with this release of the Creative Cloud desktop apps, it’ll be simpler than ever to update your apps to the latest versions. You will now have a choice when installing applications to have the install update to the latest version and remove old versions, or to install the latest version and keep old versions around (which you can uninstall on your own later).
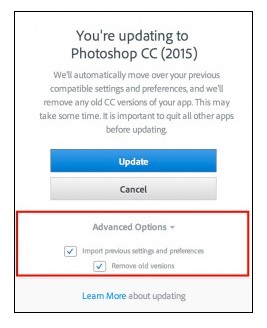
Adobe says that based on your feedback, previous versions will be uninstalled by default, and all preferences and settings will be migrated to the new version. Of course, you’re in control, so if you want to keep the old versions around, or change whether settings are migrated to the new release, you will have the option to do so as part of the install process.
Advanced Options
To install the latest version without uninstalling the previous version:
- Within the Update Dialog Box, click the arrow to the right of Advanced Options to expose those settings.
- Uncheck “Remove old versions.”
- Click “Update.”


