BTS | Early Winter by Matte Jaffe
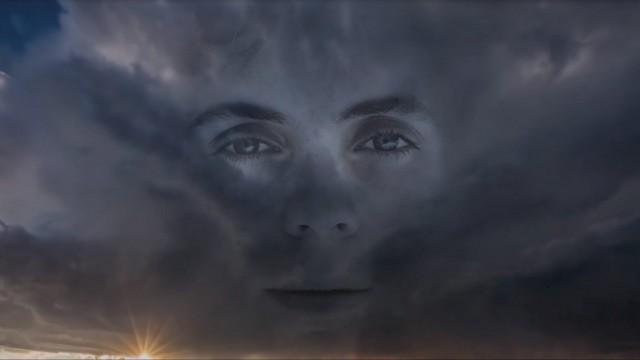
Sometimes imagination is amplified by constraints, and boundaries lead us to new solutions. This was the case for visual storytellers Gary Yost and David Lawrence, when they worked on singer/songwriter Matt Jaffe‘s latest music video, Early Winter. Pandemic restrictions led them to apply new creative production and post techniques. That’s why they chose a striking visual direction that used nature as a metaphor for our emotions; diaphanous clouds, water and birds and stars. They relied on Adobe After Effects and Mettle Flux as a tool to create organic cloud masks, and help synthesize all the elements.
BTS on Early Winter, By Gary Yost and David Lawrence
“Knowing is not enough; we must apply. Being willing is not enough; we must do.”
— Leonardo da Vinci
It’s difficult for many of us to explore our creativity without the challenge of an actual project. To push ourselves sometimes we just need to start something up and plow through it — to get it done. After a month of sitting around doing almost nothing during Spring 2020’s early pandemic shelter-in-place, it became apparent that a creative project was going to help mitigate some of our frustrations, to give us something else to focus on besides the Coronavirus. We wanted to apply ourselves to a new kind of creative project and that’s how we stumbled on the use of Mettle’s Flux as a tool to create organic cloud masks in an unusual music video for singer/songwriter Matt Jaffe. Along the way we ended up leaning heavily on Flux and other creative post production techniques because the shelter-in-place order made it so challenging to do much on the production side.
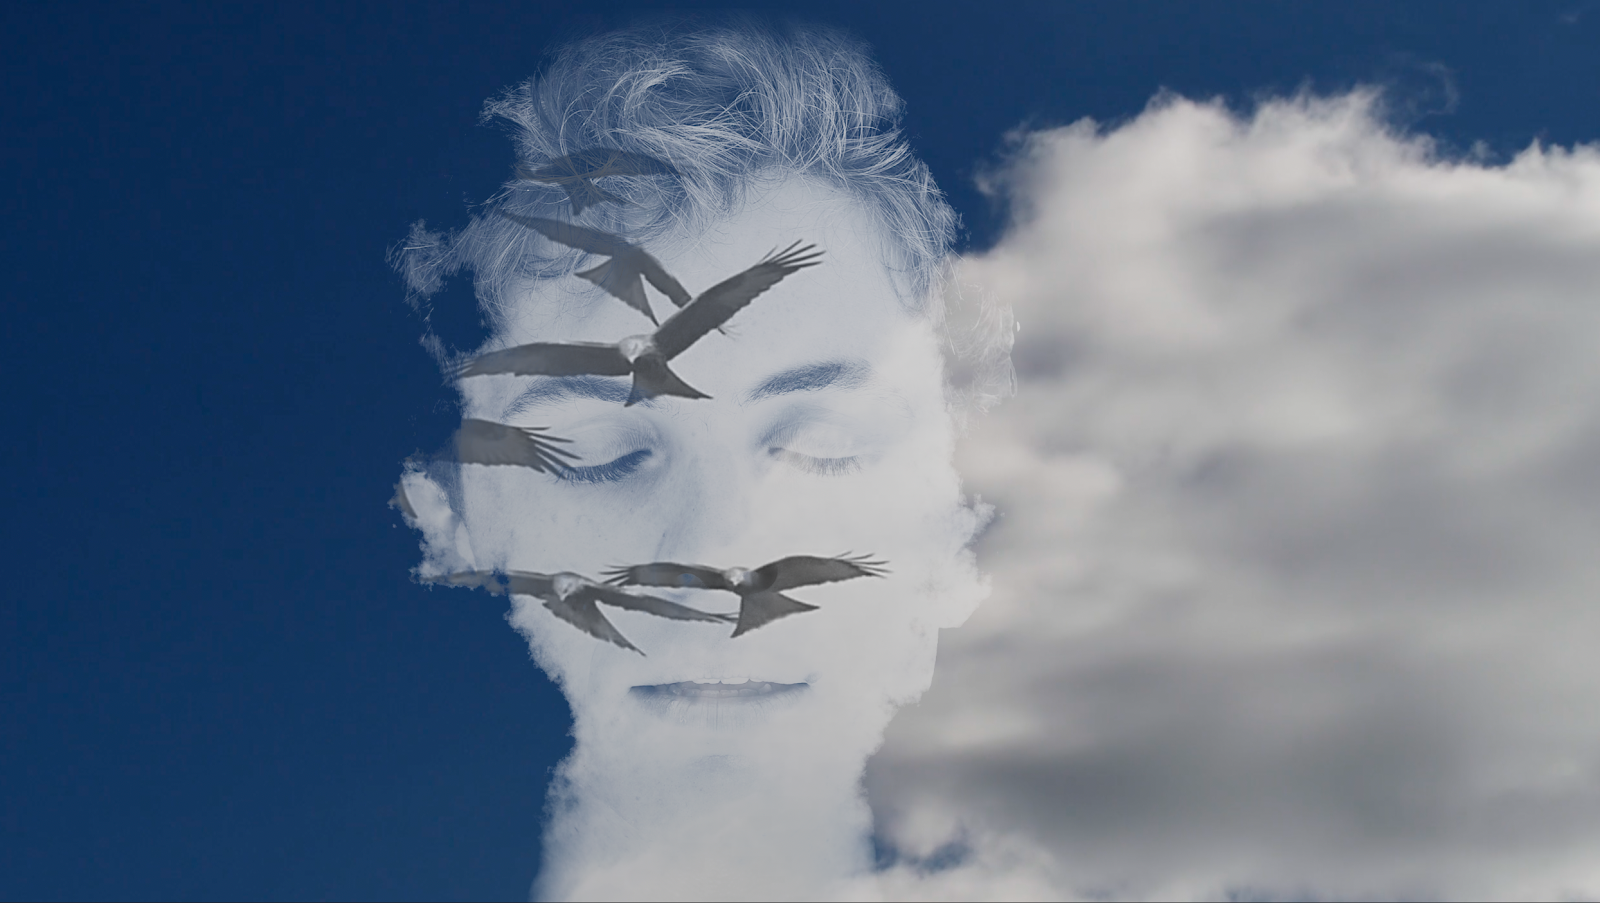
Early Winter is a lyrical love song that evokes a set of feelings reminiscent of loss. The idea for the music video visualization was to explore the feelings we have when we pay close attention to nature as a metaphor for our emotions; diaphanous clouds, water and birds and stars being emblematic of natural elemental forces. Overwhelming states of loss are frequently compared to a “sea of grief,” and to bring that into the video our focus was on how water could be a powerful symbol of this feeling. You’ll see in the final video that there are very few frames without some kind of water or clouds in them.
The chorus of the song uses the metaphor of birds to represent the soul, “An early winter is softly creeping, don’t I know her bird can sing.” For thousands of years, going back to pre-biblical times, birds have been one of the most popular metaphors for the soul,
Once we decided on water and birds as dominant visual themes we moved on to the video capture of Matt’s performance. Given our pandemically-isolated situation it was an opportunity to discover a new way of being creative by highly constraining the shoot using a single extreme closeup of Matt singing, all shot in one take. There’s a great quote by Orson Wells which speaks to this issue of how constraints amplify the creative challenge, “The enemy of art is the absence of limitation. “If you give somebody constraints, it’s easier to be creative.”
- Shoot day setup
Here’s how we set up the “studio” to record Matt on the greenscreen backdrop in the driveway. For safety, , the primary objective was to stay as far away from Matt while he was singing, and even at 15’ distance we were masked with face shields because singing can be highly transmissive for SARS-CoV-2. The shot was made with a Black Magic 4K Pocket with a 200mm lens using the ProRes 4444 codec, making pulling the key simple. Note the wet greenscreen and pink water sprayer… this is a trick to get wrinkles out of cloth backdrops very quickly… just spray and wait 20 minutes. (this photo was shot while it was drying)
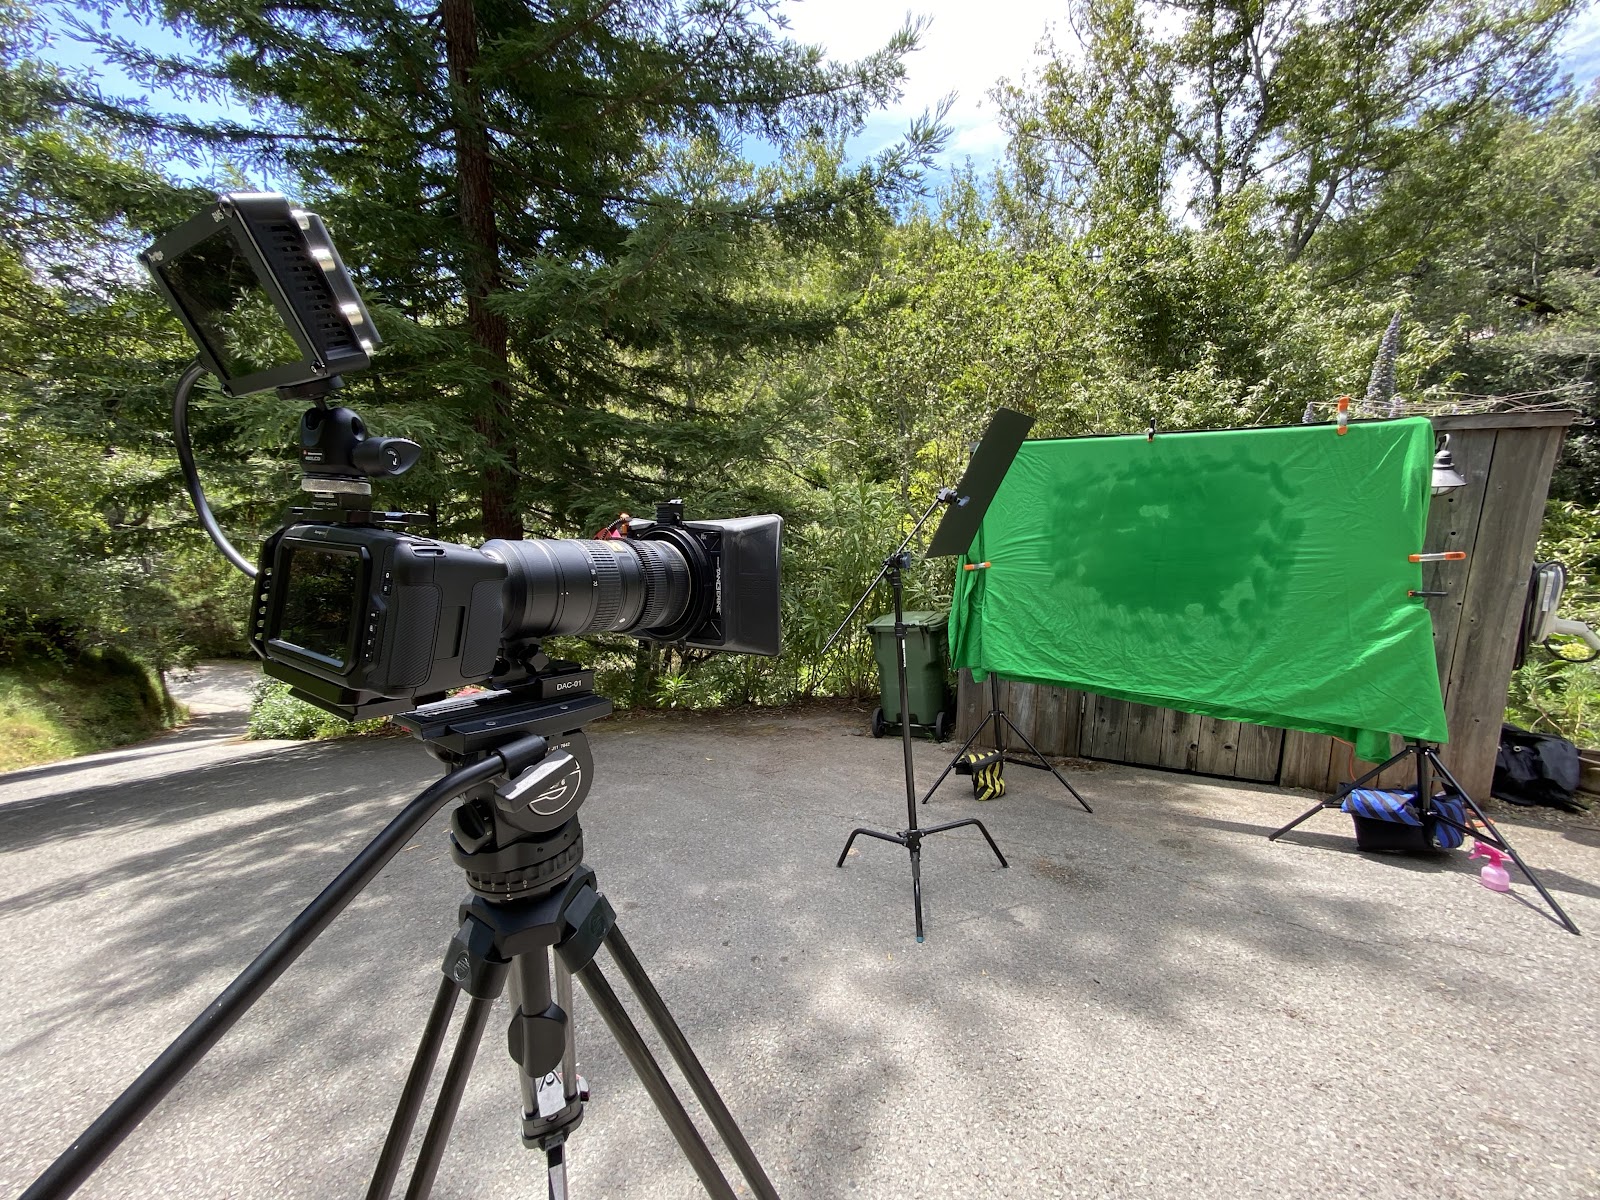
The simple setup for the master beauty shot of Matt in front of the portable green screen, lots of available light with a black reflector camera left for negative fill.
We used a b&w version of the source as the beauty plate for compositing so the fleshtones of his face wouldn’t conflict with the colors of the overlaid imagery. As it turned out we wanted a bit of eye color occasionally and the color plate did end up on the timeline, masked to show just his eyes and used judiciously, occasionally.


2: Achieving the “cloud” animated matte.
In order to composite Matt into layers of clouds and water and birds while maintaining a diaphanous feeling to the imagery the goal was to create a softly moving mask that would organically blend him into these natural scenes.
The first order of business was figuring out how to generate realistic clouds in After Effects. Whenever you have a question about how to do something in After Effects, YouTube is a great place to look for answers. Once again, a solution was there – in this tutorial:
How to create Realistic Procedural Clouds – After Effects Tutorial – No plugin
Our first attempt was to use procedurally generated fractal clouds to create a billowing, diaphanous edge around Matt’s green screen key.
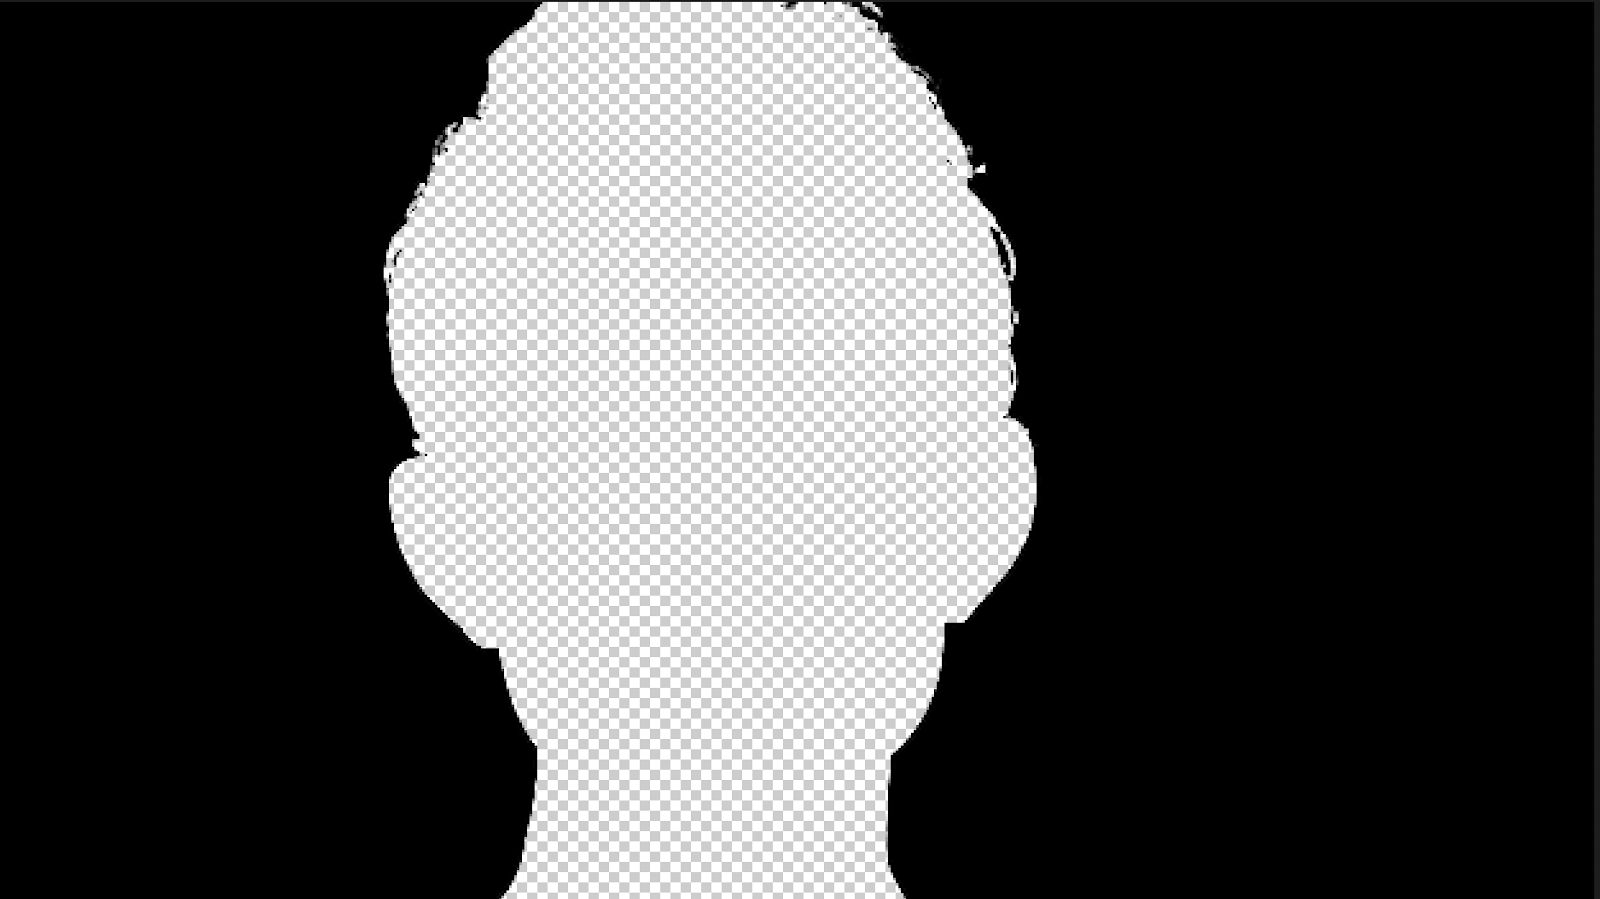
Clean edge matte (green screen key)
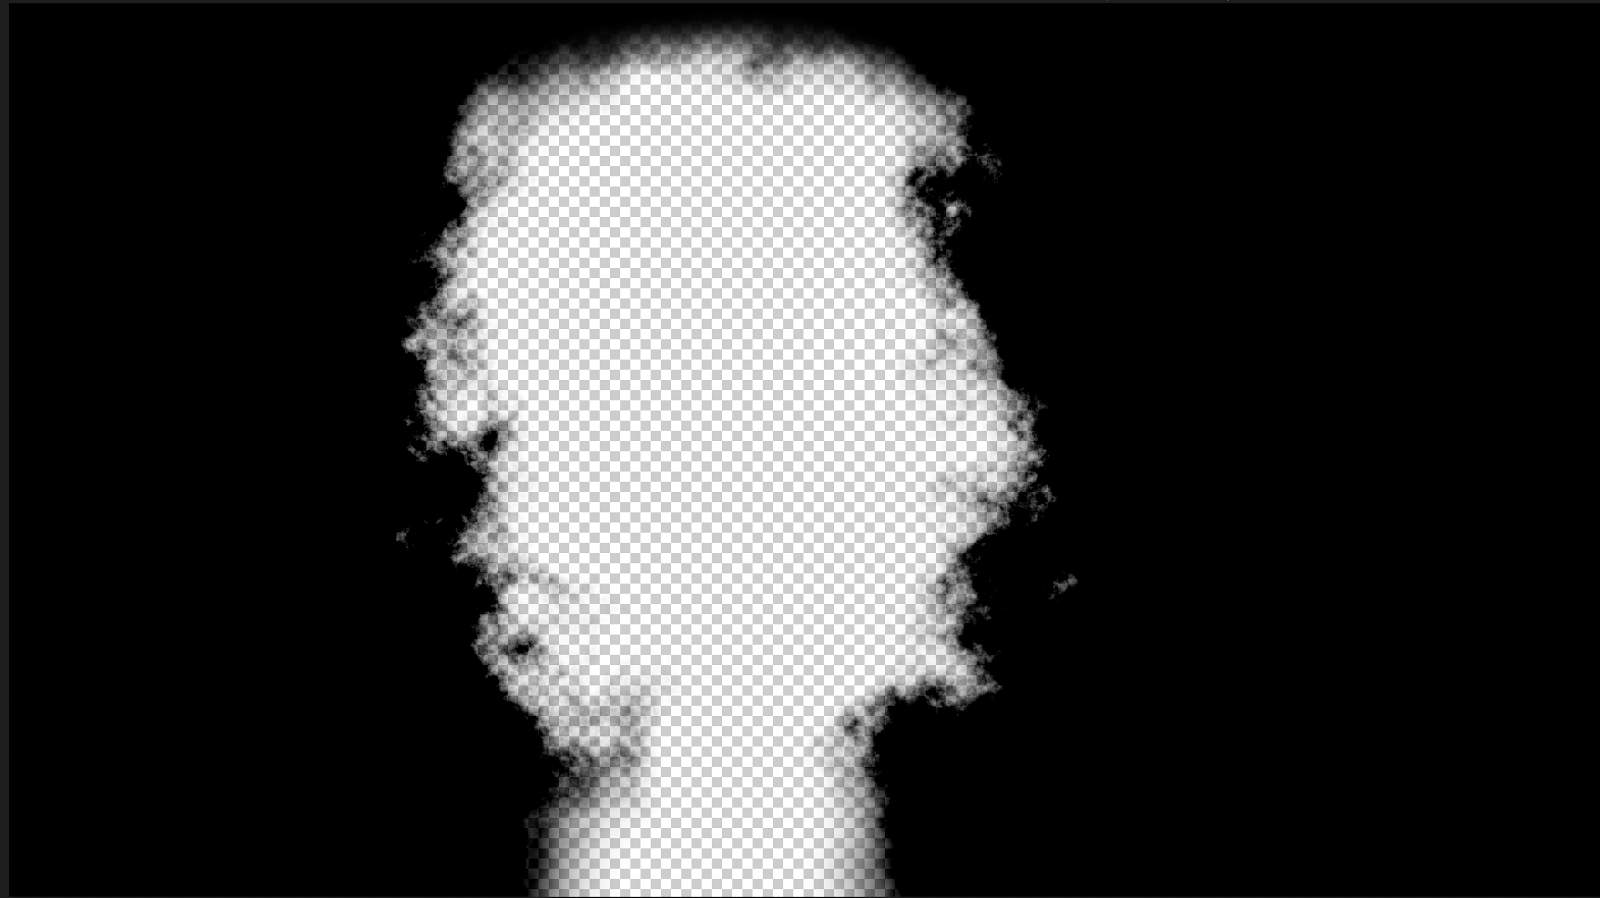
Fractal cloud edge matte
Test comp
During this phase of experimentation as we tried to figure out how to make clouds, we also experimented with After Effects’ many layer transfer modes and compositing effects. Usually these tools are easy to ignore because they’re often unpredictable and not all that useful in most applications. But in our case, with unlimited creative freedom and no pressing deadline, it was a perfect invitation to explore, learn, and have fun.
Playing with AE transfer modes without cloud matte.
As satisfying as many of these comp tests were, something was lacking. The fractal mask edges just didn’t work. Even though they moved with some degree of randomness, they felt surprisingly static and artificial, without the flowing, organic quality of water or wispy clouds.
As long-time Mettle VR users, we knew about Flux but hadn’t used it because it didn’t apply to the kinds of work we typically make with our VR documentary projects at WisdomVR. But we’d seen examples of beautiful gaseous effects made with it and thought perhaps in this case we could use it to get the organic cloudy effect we were looking for.
3: Finding our Flux
Perhaps the single most defining characteristic of Mettle Flux is the vast number of parameters allowing for a literally infinite set of effects. It’s the opposite of a highly-constrained tool and that can be slightly intimidating at first. But these two tutorials from Charles Yeager helped us get started quickly and we jumped into it with both feet, helped tremendously by the nearly real time preview at ¼ res.
https://vimeo.com/288760556 and https://vimeo.com/362796928
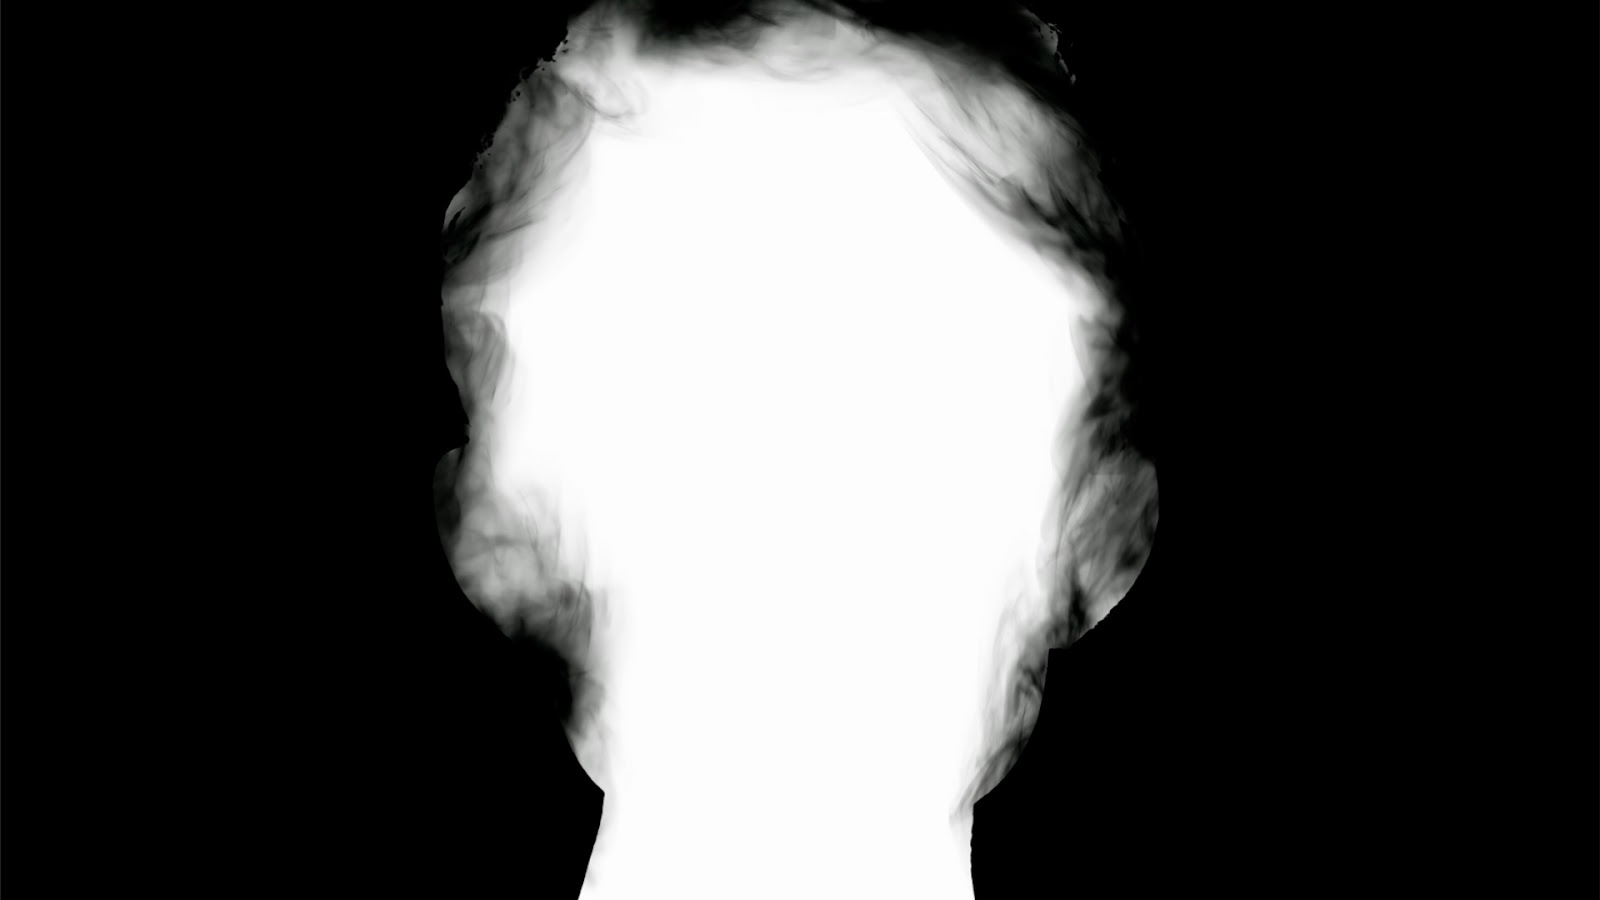
The “Solar Wind” preset provided the closest approximation of the cloud effect we were looking for and here’s how one Flux object looks on his neck area. We used this object to determine the correct value for the master Evolutions parameter so that the flowing quality matched the speed of the timelapse video of the clouds. With fast preview on one Flux object, it didn’t take long to see how smaller Evolution values worked much better than higher/faster ones.
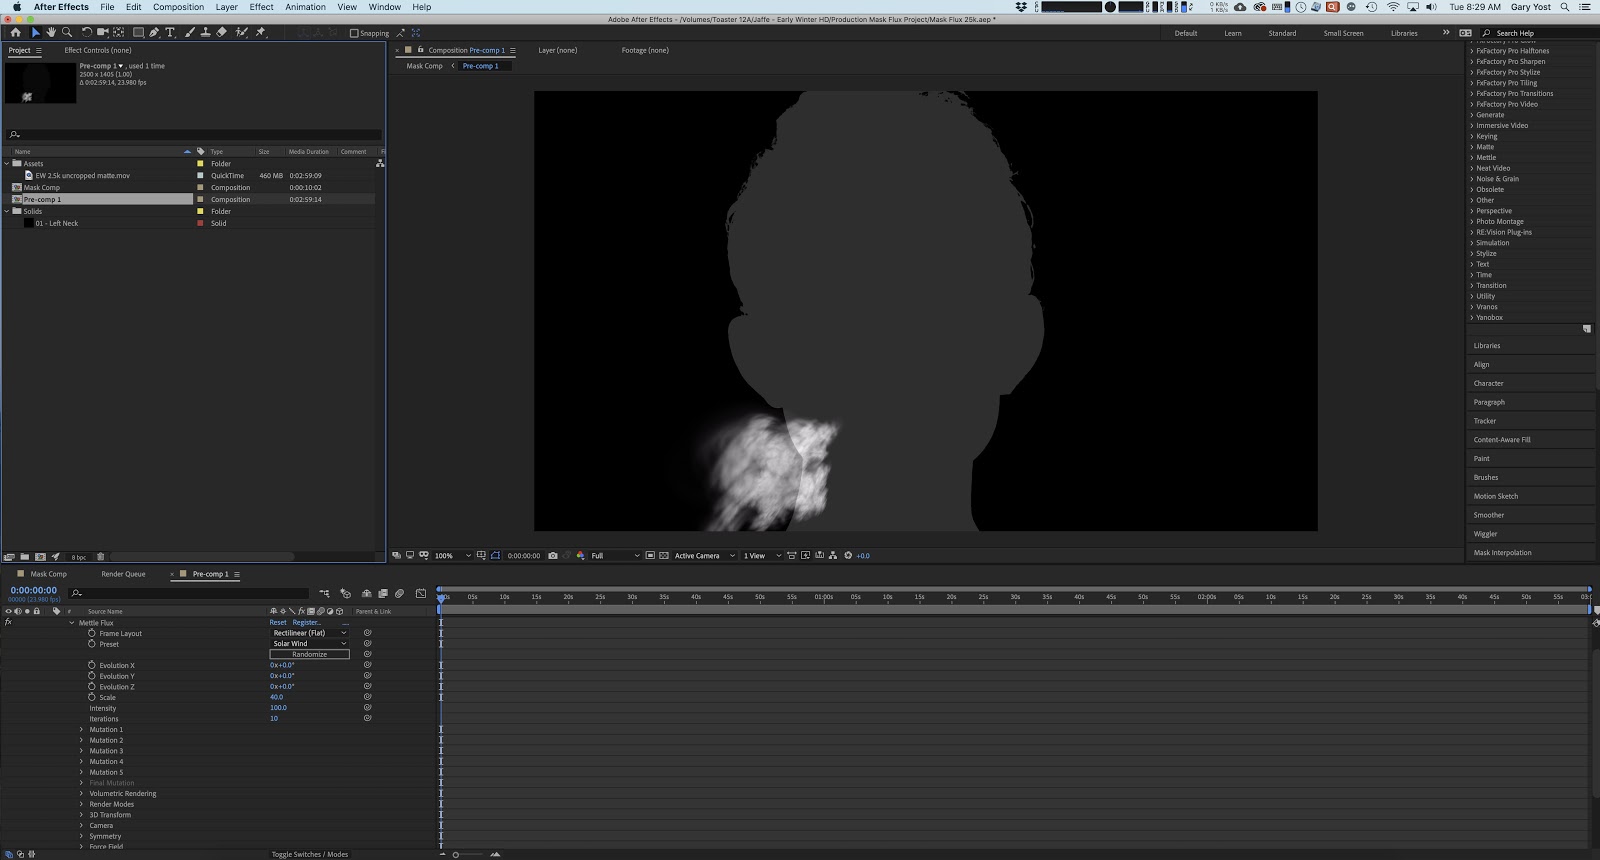
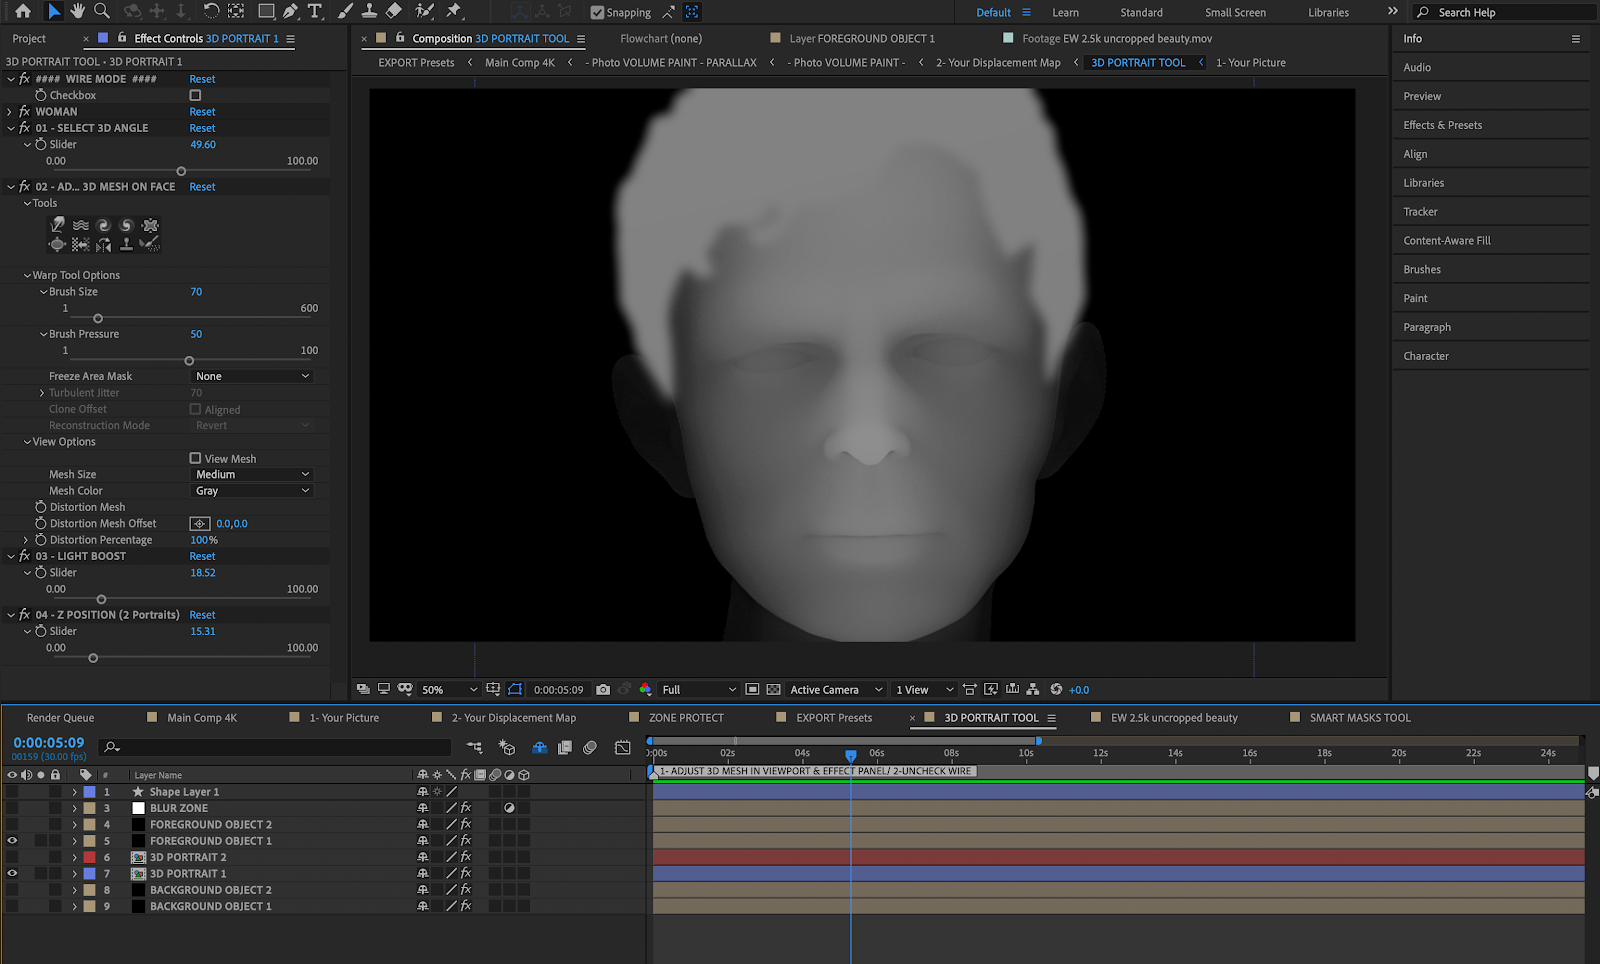
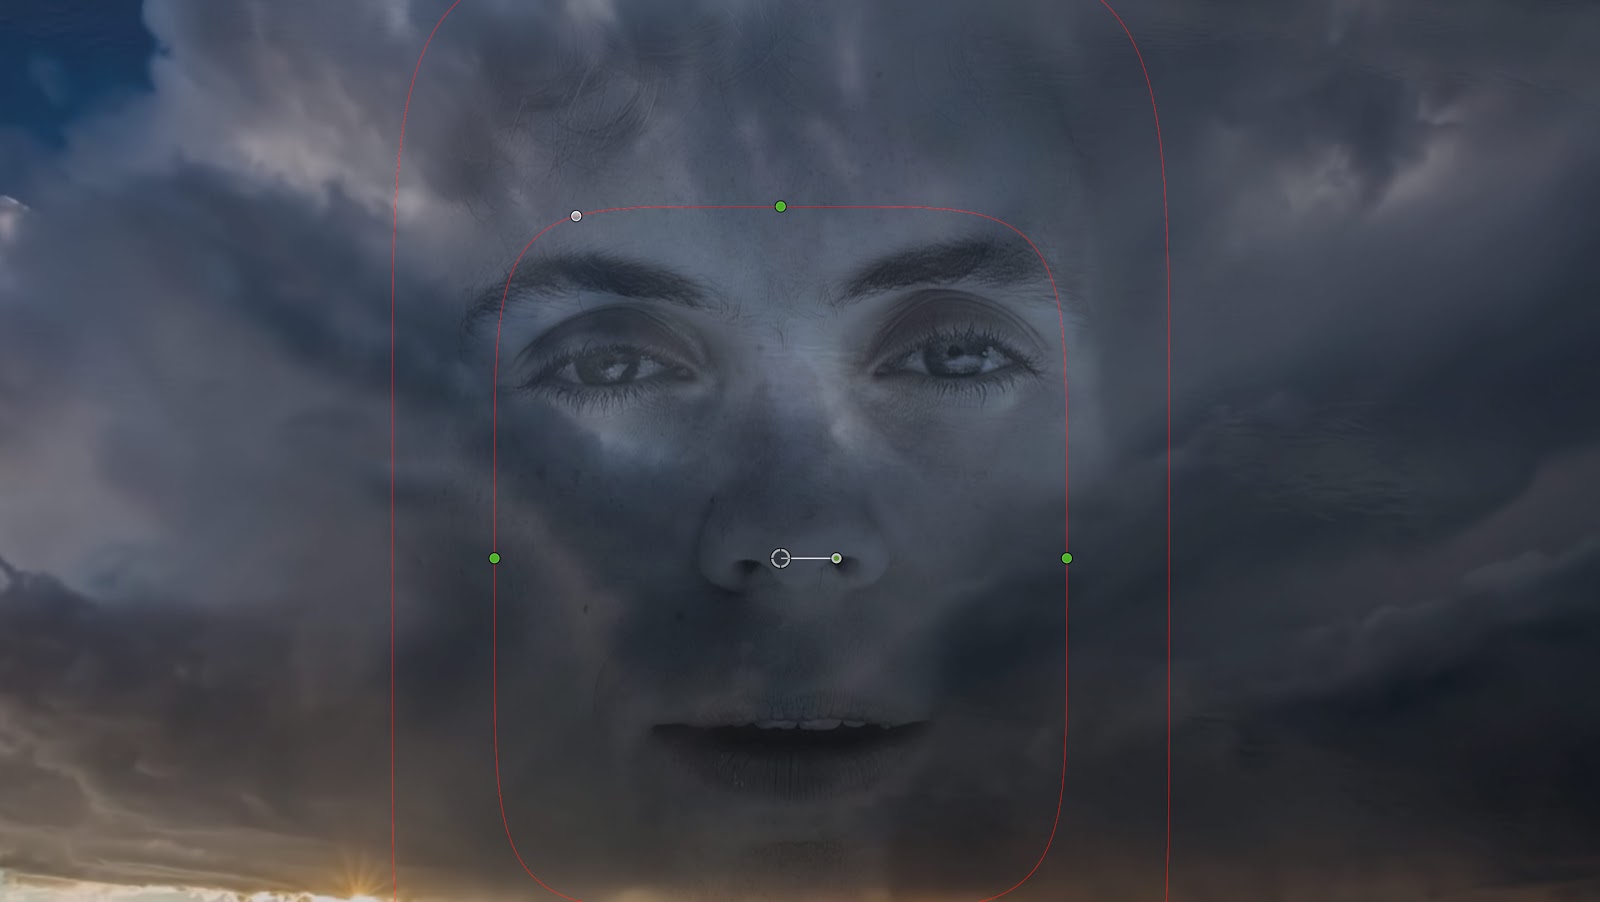
A total of 15 Flux objects were necessary to encompass the entire face and then we began to tweak everything so that we had a combination of the gaseous effect plus all edge-of-face pixels at 255,255,255 pure white so that (in the final precomp) Matt’s silhouette was made invisible. We had to use fairly high scale parameters to get the effect to the right size, with low iterations (8-10) to keep the density high in the center of the effect, but couldn’t get it just right until Ansel and Dimitry at Mettle gave us some great suggestions. First was to use the Density parameter in the Volumetric Rendering group and also to use Scale in the 3D Transform group instead of the root Scale parameter (which affects fractal generation and can produce unexpected results due to the recursive nature of that process).
We used After Effects point trackers to track Matt’s left and right earlobes and used those tracking points to keep the Flux objects locked to his face as he moved around. Otherwise his face would be moving through the Flux objects instead of the mask maintaining positional orientation to his face. Lots of previews were made in a highly iterative process to get all the Flux objects optimized in terms of speed, scale and shape.
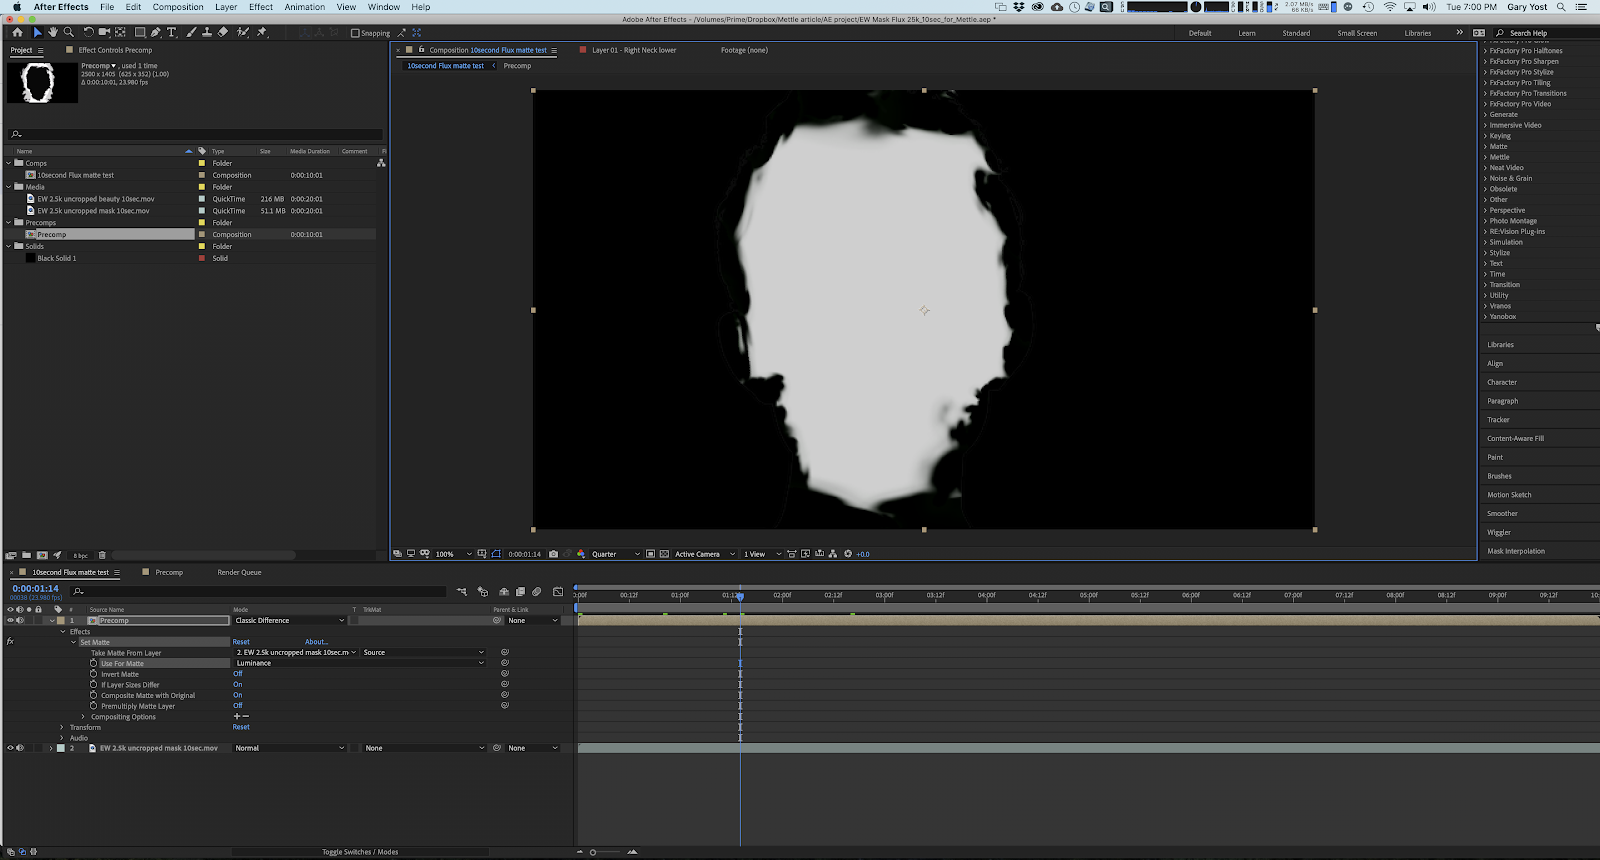
This screenshot shows the precomp of the Flux objects tracked to Matt’s face, but as you can see, the outline of his head won’t composite cleanly to pull him out of the background due to the overlapping edge of the flux objects outside his head boundary, plus all the dark grey pixels in the center.
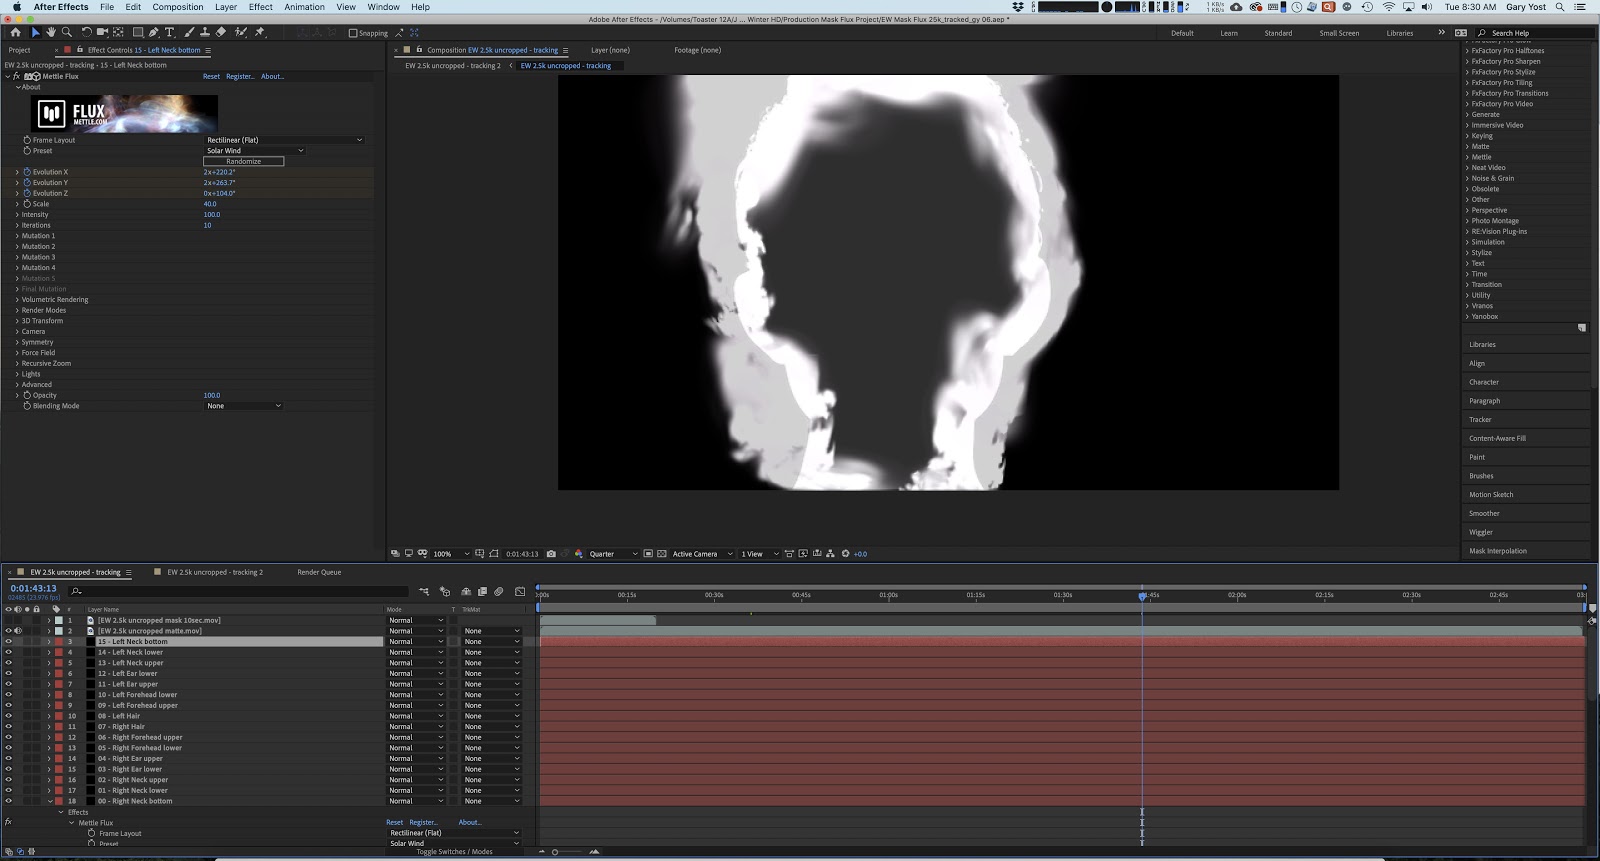
The “key” to making this work was precomping the Flux object layer and using the Classic Difference transfer mode to invert the pixel luminance values and composite it against the greenscreen-derived mask. We actually don’t know what we would’ve done without Classic Difference and it was the magic sauce that saved the entire project.
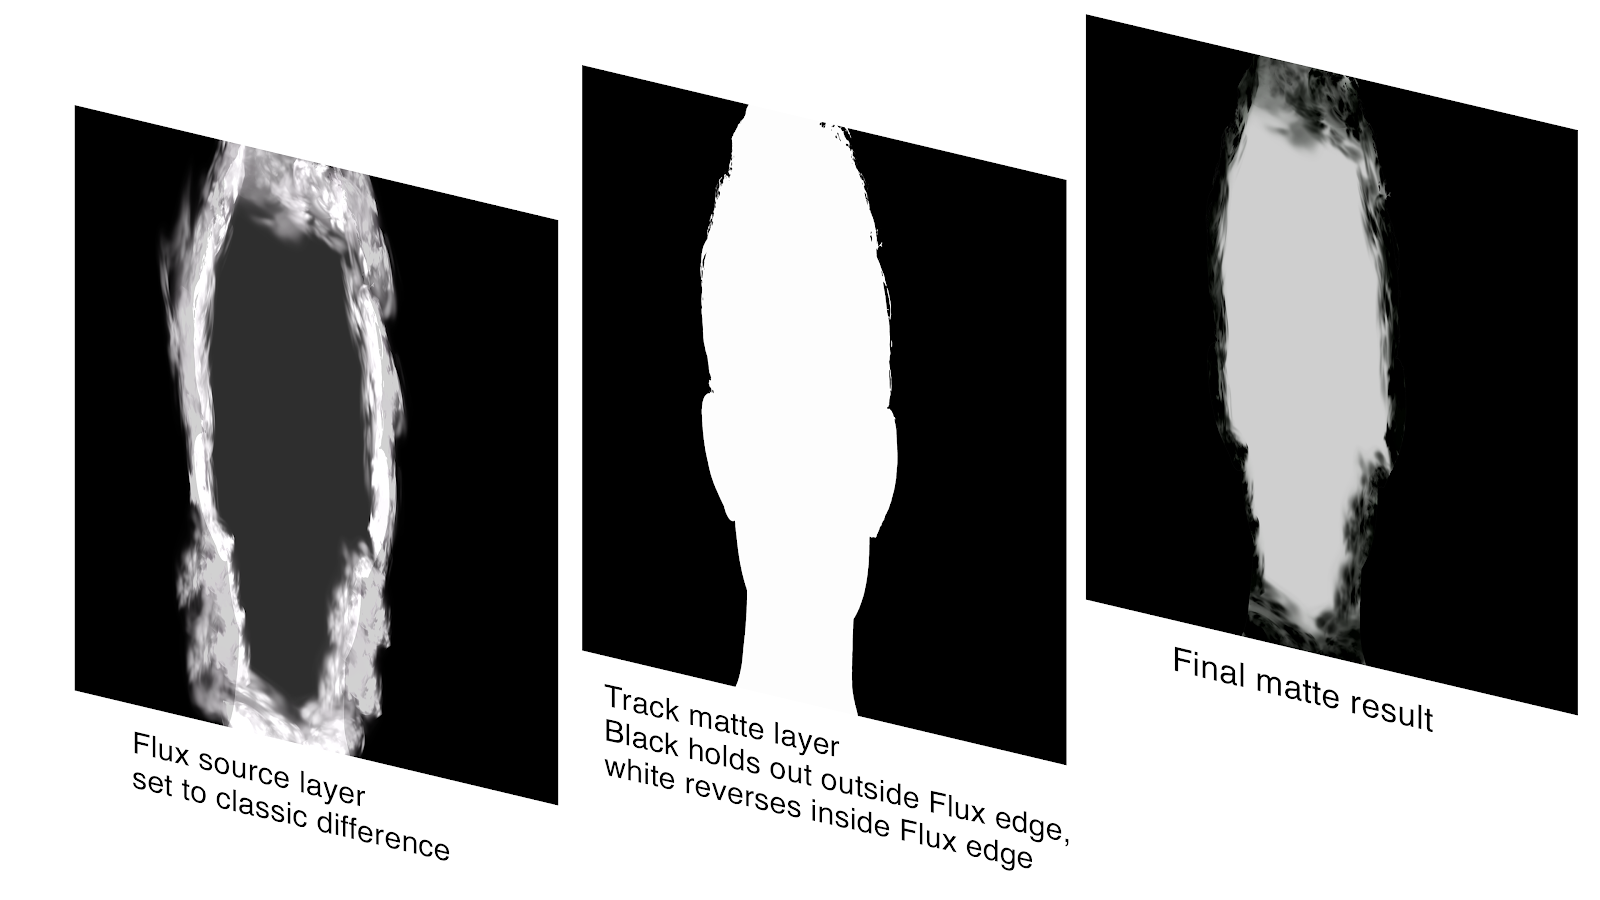
Flux matte comp pipeline
Finally, we kept the pixels in his face area below 255,255,255 so that a small amount of background imagery could bleed through, creating an additional integration between the face and the composited images.
The entire 3 minute cloud mask… it’s a small file, only 9Mb:
https://www.dropbox.com/s/ixuvkgqxcbtk9dm/flux%20matte%20example%20clip.mp4?dl=0
The After Effects Project File, 10 seconds of the song to illustrate the pipeline, including assets:
https://www.dropbox.com/sh/zpv42p4av8wi9is/AAD-AdezzWv75z3oTM0jtMUGa?dl=0
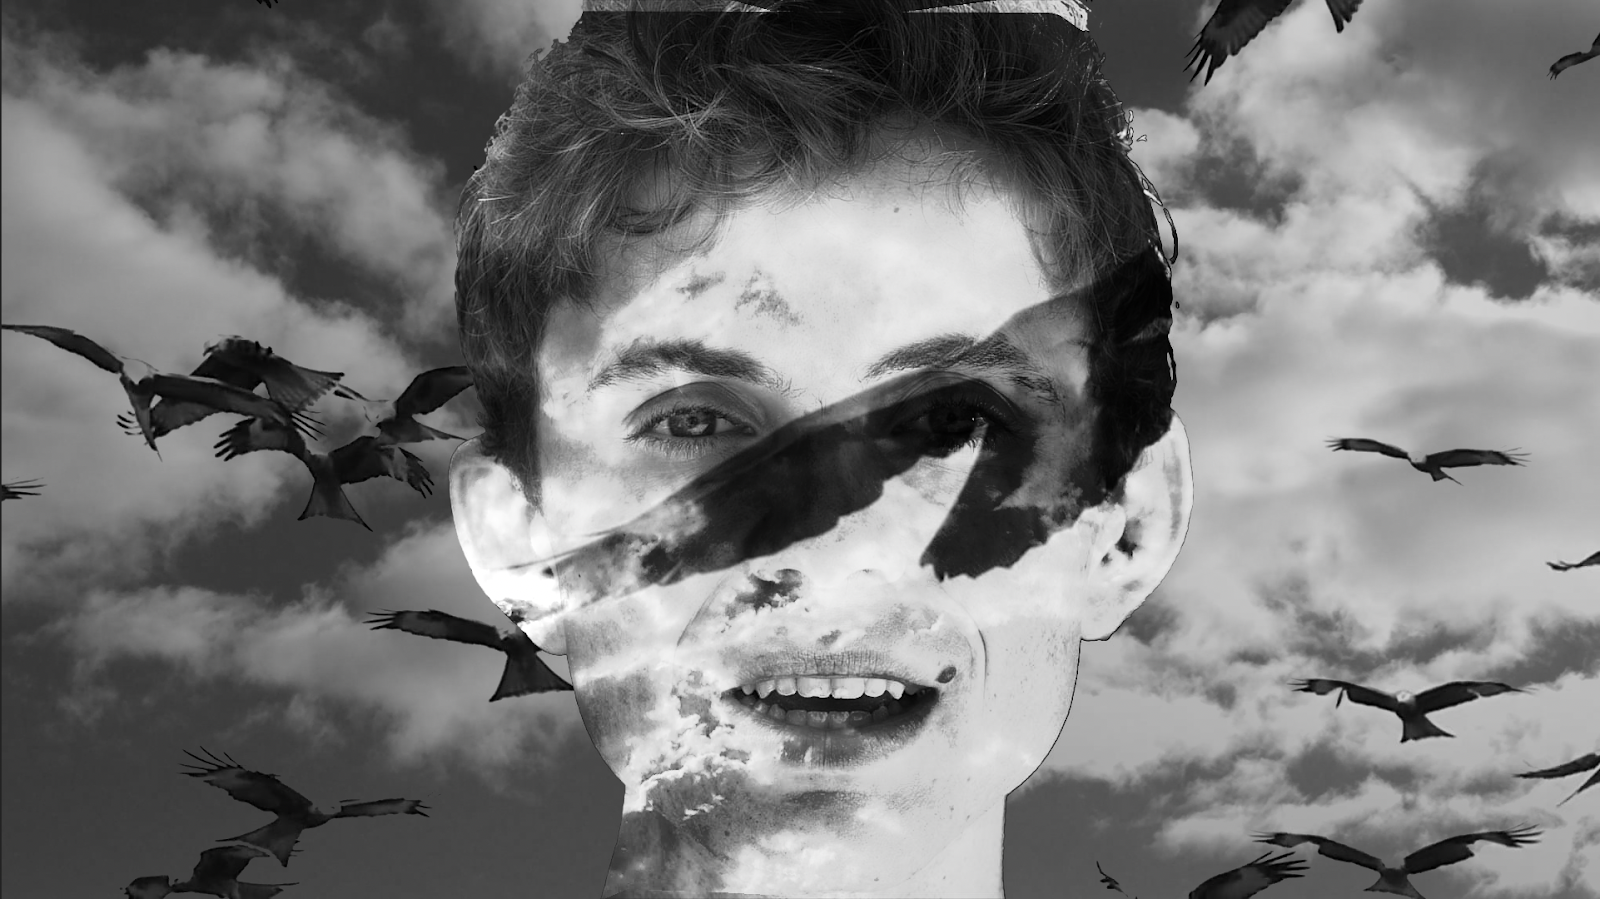
4: Other techniques to accomplish the “glass face” effect.
One of the original goals for the video was to simulate a practical effect, making it appear as if birds, clouds, water, and other natural imagery were projected onto Matt’s face as he sings. The in-camera way to do this would have been to gather video and actually project it onto Matt but as realistic as that might’ve been, it would’ve required controlled studio lighting conditions and more critically would’ve locked us into that footage with no opportunity for any further creative decisions. We needed a much more flexible solution and that led us to depth maps.
A depth map is a grey-scale image that’s paired with a corresponding photograph. The depth map’s brightness describes height for every pixel in the photo – with black being farthest, and white being nearest to the viewer.
Depth maps can also be used for 3D texture mapping and we knew that if we had a depth map of Matt’s face, we could use that to map natural textures and it would look like the textures were projected.
But how to make the depth map? These are starting to become more ubiquitous, for example Facebook uses depth maps generated by your phone’s camera to make the 3D photos you may have seen when scrolling your feed. And of course since we were shooting motion video, we’d need an animated depth map that corresponded to Matt’s facial movements.
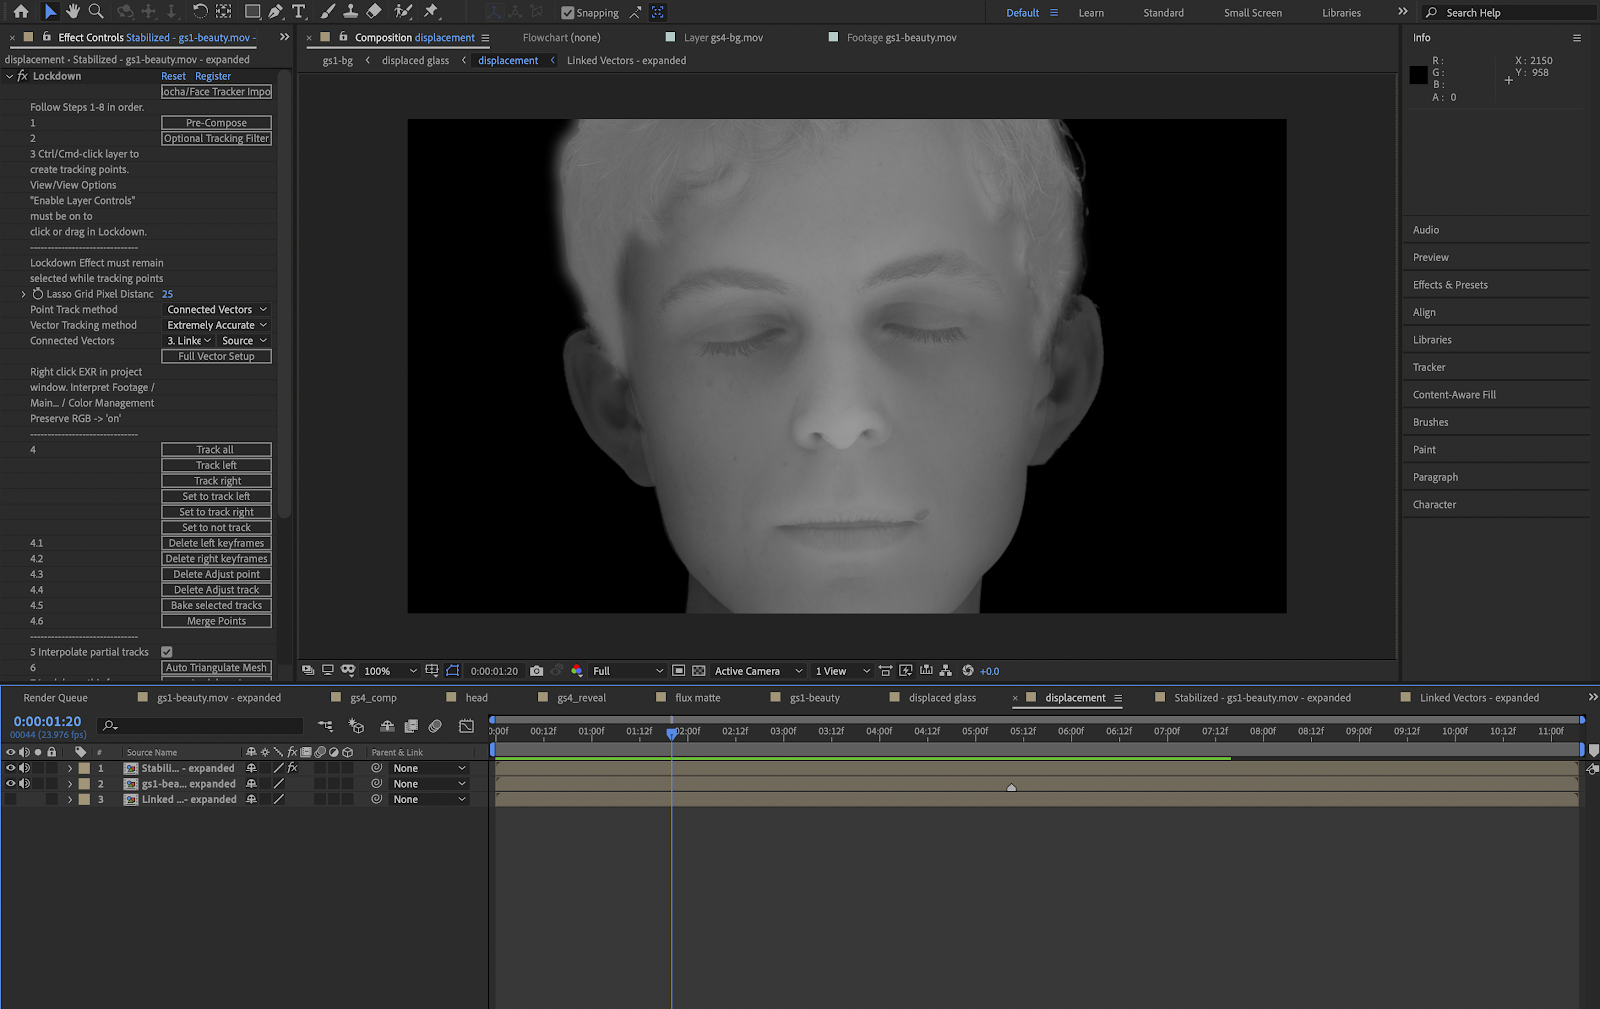
Around this time, we discovered an early version of Lockdown – an After Effects plug-in for mesh tracking and texture warping. Lockdown does an amazing job mapping textures onto warped, moving surfaces but it’s geared towards short effect shots and ended up only being practical for us to use for the shots that used the glass face effect (which we didn’t even realize yet was a possibility until a serendipitous discovery happened which is described later in this post).
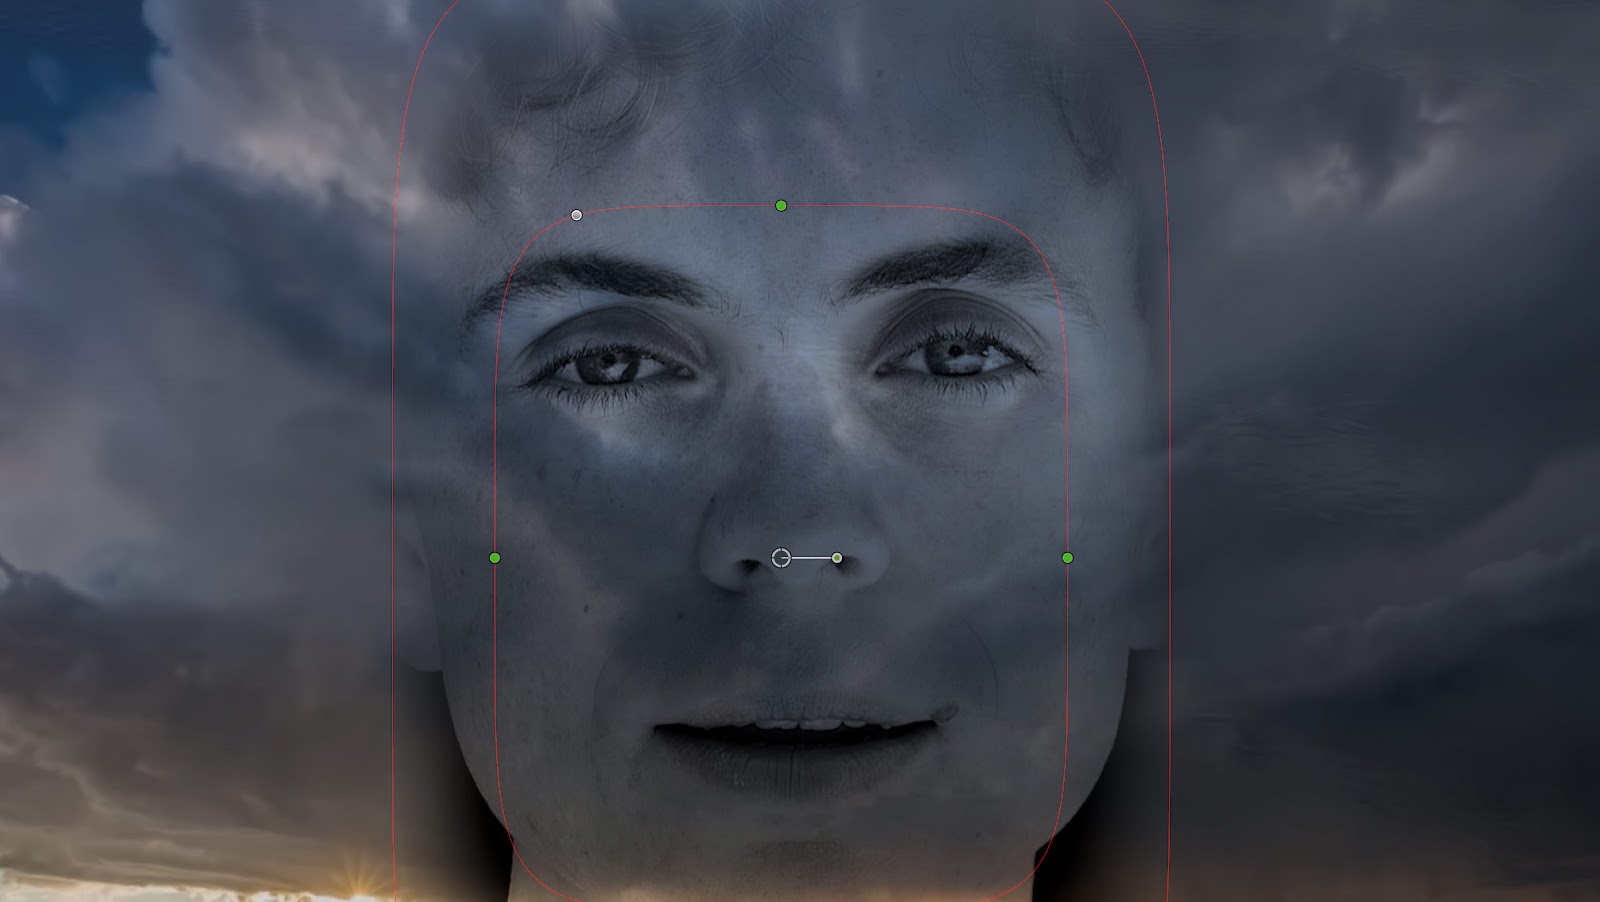
Still looking for a way to make depth maps from existing photographic images, we came across a unique toolset for After Effects called VolumMax 3D Photo Animator. VolumMax 3D is a set of specially designed comps and assets with a guided workflow that enables depth map creation from still photos. One of its features is a portrait template designed to work with medium-to-close headshots. This was perfect for the shot of Matt.
VolumMax 3D wireframe mode
We chose a neutral frame of Matt’s face and used VolumMax’s mesh tools to sculpt the default male portrait head to match Matt’s features. This gave us a neutral depth map that looked like Matt.
VolumMax 3D depth map mode
To further refine the depth map, we composited it with the greyscale image it was derived from. This added detail, making it photographic.
Final depth map
The next step was animating the depth map and for this we went back to Lockdown. The idea was simple — use Lockdown to track Matt’s facial movement and wrap the depth map image over Matt’s face as a texture. This would make the depth map move in sync as he sang.
It worked! Sort of. Head movement was spot on but as soon as Matt started singing, the depth map mouth was kind of a mess. But there was a bigger problem. We did some tests with a short clip from the beginning of the song where the depth map tracked well and was clean. We wanted to see how the birds looked using the animated depth map and After Effects’ Displacement Map effect to project them onto his face. The results were… unimpressive. The effect worked, but it was so subtle that it was barely visible, hardly worth the effort involved. But playing with the effect led to another fun discovery.
One of the best ways to understand what a plug-in parameter does is to crank it way up and observe the effect. Doing this with the Displacement Map effect, started wrapping the bird texture over itself, creating a glassy kind of effect. Using a cloud background instead of birds made it look like Matt’s head was made of glass! This was a very different effect then what we were going for, but it would work as a beautiful, contrasting transition between verses of the song.
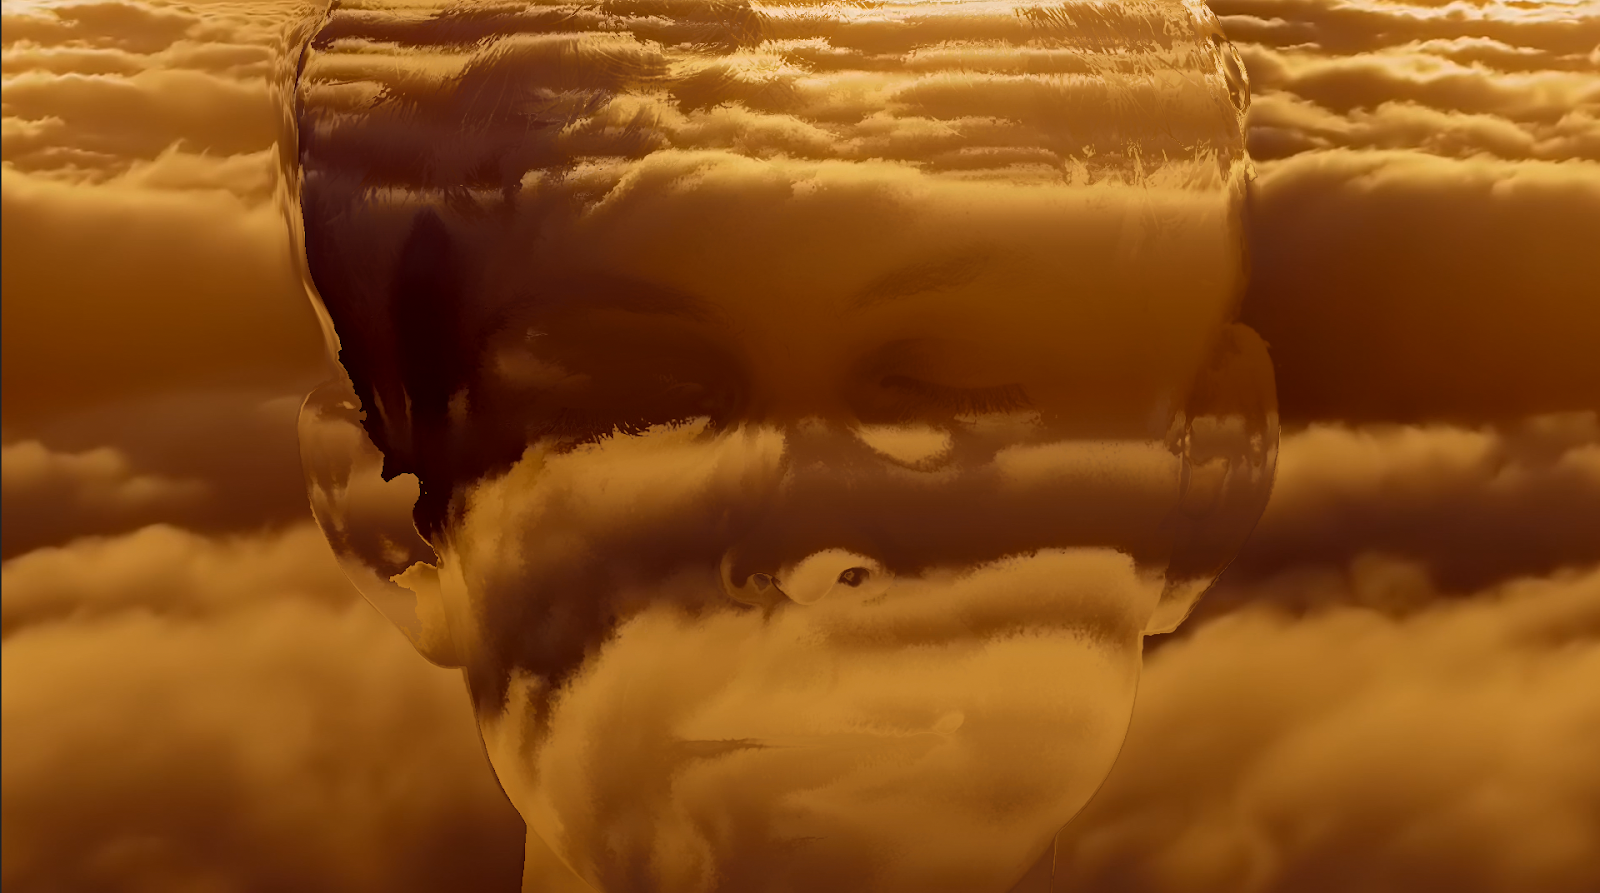
“Glass face” final effect
5. Putting it all together.
Once we had our perfect Flux mask, the real fun started… pulling cloud/water/bird assets together and playing for weeks in FCPX with various blending modes in a totally unconstrained way, using additional shape masks (to bring in eye color, for example) and get the timing of all the transitions just right. When faced with so many options it sometimes becomes difficult to choose one over another, so this became a process of spiraling into an edit that supported the music in the best possible way, sometimes quite literally (eg, the “flash of pain” lyric and the lightning).

Here’s a comparison of what a traditional shape mask comp looked like with no matte, just a shape mask.
But once the Flux mask is applied it all comes together perfectly.
6. Imagination amplified by constraints.
The very tight restrictions in place in the earliest shutdown during the pandemic in April 2020 created the opportunity to play with the dynamic of how constraints can be a powerful force for creativity.
Perhaps the best-known example of this is when Keith Jarret showed up at the Cologne opera house in 1975 for a performance and the piano he’d requested wasn’t there, and instead he found a tiny, clunky, out of tune instrument. Without the ability to play what he’d intended, he spontaneously improvised an entirely new piece based on ostinatos and rolling left-hand rhythms as alternatives to the piano’s weak bass notes. On top of that he’d had no sleep for 24 hours and had barely eaten. But defying all those bad odds, the concert was a huge success, the recording sold millions of copies (including one to me), was inducted into the GRAMMY Hall of Fame and is considered the most successful solo jazz album of all time.
Constraints. Love them, embrace them and most of all have fun with them!


